This Site Moved to New Self-Hosted Site

For those of you who following this site, I have decided to move it new self-hosted WordPress site, with the same name.

I will start updating the site more with content, videos, and recommended resources. Please join me on the new site, and subscribe to the site to receive updates by email.

Thanks,

Bakari

How to Automatically Open an Application On a Second Monitor

1. Create a new macro, and select Trigger by application. Choose the application you want to open on the second monitor.

Keyboard Maestro Editor

2. Click on the “Interface Control” folder. Add “Manipulate a Window” to macro.

Open Actions Library

3. Click on the “Scale size by” drop-down and select any of the preset sizes under “Move and Resize”

Select a Custom Preset Size

4. Click on “Move and Resize” and select “Center at”.

Choose Center at

5. Change the coordinates in the two fields to the following.

Change the Cordinates

Test your macro to see if it works. The application window should move to the center of the second monitor, when it’s activated.

How To Click A Button On A Web Page Without Using the Mouse

Mac automation makes me lazy, because that’s what computers should do. They should reduce the steps we have to take to get things done. For instance, nearly every other day I have to enter some data in a text box, and then hit the save button. It only takes about 15 seconds to complete the task, but why should I have to move my hands off the keyboard to click the Save button?

Click save

Well not anymore. With a Keyboard Maestro macro, I can click the Save button by typing three letters. Here’s how the macro looks:

Keyboard Maestro click save

I first tried using the Click Safari Link action, but it didn’t work. So I turned to the Move and Click Action. I took a screenshot of the Save button, and then I changed the “relative to the” part of the action to “found image’s center.” And then I dropped the Save screen shot into the image box.

I assigned a string trigger to the action, and now when I type “svv” (which immediately disappears) after inputting text, KM clicks the Save button for me, reducing one little annoying step I need to take.

I use this action setup to click other buttons in my daily workflow. It’s a nice little time saver.

Use Keyboard Maestro to Highlight Text

In Apple’s Preview, you probably know that you can use the application’s annotation tools to highlight text in PDF. But for most other applications, there’s no annotation tools to do the job. In TextEdit and the Notes app, you can use the Format feature to change the font style color of text, and use that has a highlighter, but the process is requires too many steps.

But if you’re a Keyboard Maestro user, you can create a couple of highlighter macros for applying a color style or highlighter to text in nearly any text-based application.

Red Strikethrough Macro in Macro Library

wpid434-red_strikethrough_macro_in_macro_library.png

Keyboard Maestro contains a Macro Library (Windows > Macro Library)  with dozens of extra macros that you can add to your macro library. In the Text folder, there’s a Red Strikethrough macro, which will change selected text to Red with a strikethrough. Insert that macro into your library, and you can quickly see how the workflow works.

Red Strikethrough

wpid433-red_strikethrough.png

The above screenshot is what the Red Strikethrough looks like. If for some reason it’s not in your Macro Library, you can simply create it by adding the steps above. But notice you can change this macro and use other types of styles. I don’t have much use for a red strikethrough, but I do like highlighting text so that I can review a document for important details.

Highlighting Text

wpid431-highlighting_text.png

Red Highlighter

wpid432-red_highlighter.png

I wanted way to highlight text, so I duplicated the Red Strikethrough macro a couple of times and made changes the settings, so that I could have a three different macros–a green highlighter, a red highlighter, and a yellow background highlighter.

The Yellow Highlighter

wpid435-the_yellow_highlighter.png

To create the yellow highlighter, I simply unchecked the Foreground color and enabled the Background color, and selected yellow.

If you found this macro useful let me know. And if you similar ideas for macros, please share them.

How to Create an Automatic Email Template To Use in Keyboard Maestro

“Bakari, can you share the KM workflow for creating an email template with select email addresses, etc.?”

Thanks for asking, Brian. Unfortuneately, KM alone doesn’t handle email templates as well as say Automator. But thankfully KM can trigger Automator workflows. So here’s the steps to do that.

Create New Workflow in Automator

create_new_workflow_in_automator.png

Add a New Message Action

add_a_new_message_action.png

Set Up Your Email Template

set_up_your_email_template.png

Note: if you want to add different information to the template each time you send it, be sure to check “Show this action when the workflow runs.” You enable the workflow to show only selected items.

Save the Workflow in a Permenant Location

save_the_workflow_in_a_permenant_location.png

Note: KM Automator workflows, not Automator Applications. So be sure to save your workflow in a folder where KM can find it.

Create a New Macro in Keyboard Maestro

create_a_new_macro_in_keyboard_maestro.png

Add the “Execute an Automator Workflow” action to the macro, and then attach the Automator workflow file you just created. Give your macro a name and trigger, and you’re good to go. You will probably only want your macro to run in Mail, so create add to your Mail macros folder.

Let me know how this setup works for you.

How to Use Named Clipboards in Keyboard Maestro

This tutorial is about Named Clipboards in Keyboard Maestro. But first I’m going to briefly describe the difference between the Mac’s systemwide clipboard, and the basic clipboard feature in Keyboard Maestro.

Just as your Mac has a systemwided clipboard, Keyboard Maestro also has a global clipobard. KM however can save a history of everything you copy on your Mac, whereas the Mac’s clipboard only saves one clipping at a time. Each time you copy something new on your Mac, it replaces the previous copied item on the clipboard. But with Keyboard Maestro, it saves a copy of each new clipping you make. (Note: the Saved Clipboard History is not by default enabled in KM. So you will need to enable it in Preferences > General > Save Clipboard History.

The screenshot below shows KM’s Clipboard History Switcher. The keyboard shortcut Command-Control-Shift-V will bring up the switcher. If you find that keyboard shortcut a little awkward you can change the hot key assigned to it. The name of the macro is Activate Clipboard History Switcher. If you don’t find it in the Clipboard Macros folder, just do a search for it in KM.

With the Clipboard History Switcher, you can of course paste clippings on the list into any application. Notice you can also star individual clippings as favorites. Starred clippings will remain in the history. You can also send selected clippings to another Mac that has KM installed, but I’ll cover that in another tutorial.

Now let’s move on to Named Clipboards.

Clipboard History Switcher Window

clipboard_history_switcher_window.png

Note: The Clipboard History Switcher captures text and image clippings, as shown above.

Overview of Named Clipboards

The Named Clipboards feature in KM allows you how to create as many clipboards as you like, but unlike the Clipboard History Switcher, Named Clipboards only retain one clipping at a time. Each time you copy a new clipping to a Named Clipboard, it replaces the previous clipping. At first that might not sound very useful, but when you learn how to use Named Clipboards you’ll see how they can be used in actions and macros.

So a way to think about Named Clipboards is that they are temporary or permenant ways to hold clippings, including text or images. Named Clipboards can be activated by any of the KM’s triggers, including hot keys. Named Clipboards work similarly to clipboard managers such as TextExpander. I find TextExpander more useful for storing hundreds of regularly used snippets that I frequently use while writing, whereas I use Named Clipboards for special automations.

To get a good idea of how Named Clipboards work, let’s create one.

Step 1: Create a New Macro. Add “Copy to Named Clipboard”

step_1_create_a_new_macro-_add_copy_to_named_clipboard.png

Click on the “Default Clipboard” drop-down button of items, and selecte “New”.

Step 2: Type “Temporary” in the Named Clipboard field.

step_2_type_temporary_in_the_named_clipboard_field.png

Note: whatever is already on your Mac’s systemwide clipboard will appear in the Named Clipboard box. Ignore that for now. So essentially you have created your first Named Clipboard, which gets listed in the Clipboards section of KM’s Preferences. You can add as many clipboards as you like.

Notice also that you can add Named Clipboards in the Clipboards section (click the + button, and then type or paste whatever text you want to permenantly remain there. For instance, you can create a Named Clipboard for a boilerplate letter, another one for your business address, and perhaps one for your Facebook URL. Each of Named Clipboard can be assigned a unique trigger and can be used like any other macro action.

Step 3: Add a Trigger and name for the macro.

step_3_add_a_trigger_and_name_for_the_macro.png

Now you can use this macro to copy snippets directey to your Temporary clipboard. The snippet will also get copied to your Mac’s systemwide clipboard, as well as KM’s Clipboard History. However, until you copy a different item (snippet of text or image) to the Temporary Clipboard, the item you last copied to it will remain there.

In addition to copying text to the named clipboard, you can open the clipboard in Preferences and manually type what you want to store and paste. But since this is a Temporary clipboard you probably will use it to just store a piece of copied text temporarly.

Now let’s create a macro to paste whatever is on your Temporary clipboard.

Step 4: Create a new macro and add “Paste From Named Clipboard” Action.

step_4_create_a_new_macro_and_add_paste_from_named_clipbo.png

Change Default Clipboard name to “Temporary”—the name you used for the Named Clipboard. Give the macro a name and a Trigger. Now you can paste whatever is on your Temporary clipboard into any application.

Advanced Named Clipboard Actions

Named Clipboards can be used in other macros and actions. In the next step we will create an action that briefly displays what’s on your Temporary clipboard.

Step 5: Create a new macro and add the “Display Text” action.

step_5_create_a_new_macro_and_the_display_text_action.png

1) Where it says, “Insert Token”, select “Named Clipboard” from the drop-down menu. 2) Change the “Default Clipboard” to “Temporary”. Give your macro a name and Trigger. 3) Click the View button in the action to quickly see if the action works. A text box with the copied item currently in your Temporary clipboard should display for about five seconds. Note: You can change Display text briefly in the action to another type of action, such Display text in a window.

For another example of how to use Named Clipboards in a macro, see my tutorial on Create a Paste Current URL Macro.

Please let me know what you think of this tutorial. If you found any part confusing, just drop me a line and let me know.

Create a Paste Current URL Macro

The following steps below will show you how to set up a Keyboard Maestro macro action that pastes the current Safari URL from within any application. This macro saves you from having to select and copy a URL. Safari does not have to be the forefront application in order to use this macro. Just make sure that the URL you want to paste is the current visiable tab in Safari.

Note: This macro action replaces the previous action I outlined over a year ago about how to use KM to get links into MarsEdit. The screenshot below is how the macro will look when you have created it.

Keyboard Maestro Editor

keyboard_maestro_editor.png

Step 1: Create a new macro and add the Set Clipboard to Text action to the editor.

step_1_create_a_new_and_add_the_set_clipboard_to_text_act.png

Step 2: Click on System Clipboard and select New… from the drop-down menu. Type and add Linked URL or any name you want to give it.

step_2_click_on_system_clipboard_and_select_new-_from_t.png

Step 3: Type the code you see in the screenshot below or select it under Insert Token.

step_3_type_the_code_you_see_in_the_image_below_or_select.png

Step 4: Add the action, Paste from Named Clipboard

step_4_add_the_action_paste_from_named_clipboard.png

Step 5: Change the Default Clipboard to the “Linked URL” you created in step 2.

step_5_change_the_default_clipboard_to_the_linked_url_you.png

Step 6: Give the macro a title and assign a hot key trigger.

step_6_give_the_macro_a_title_and_assign_a_hot_key_trigge.png

Now you’re set. You can paste the URL of the current Safari tab into any application.

Using Keyboard Maestro to Insert Titles and URLs in MarsEdit

The following macro copies the selected title of an article and then switches to MarsEdit and pastes the title. It then switches back to Safari and copies the URL for the article, and finally switches back to MarsEdit to add the link. This macro does exactly what you would do manually, but it does it with a simply keyboard shortcut trigger. I tried using Keyboard Maestro’s Set Clipboard to Past Clipboard action to reduce the switching back and forth between apps, but that macro didn’t work consistently.

You can see a video of how it works, here. I slowed the maco action down some so you can better see how it’s done.

One Click Pause, Play and Hide

KeyboardmaestroWhen I listen to my favorite music streaming site, Rdio.com, I typically have to pause what is playing in its Mac desktop player in order to answer the phone or when I’m dictating an article, as I’m doing now using Dragon Dictate. In order to save myself a few clicks in order to pause or play Rdio, as well as to automatically hide it, I created two little click-saving macros using Keyboard Maestro.

One Click Pause and Play

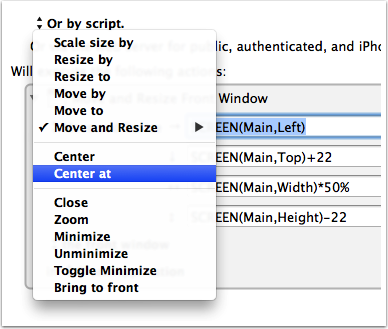
To pause or play music in Rdio, I set up a macro that activates these menu items when I click on the Rdio icon in my Dock and brings the application briefly to the front. If music is playing, the macro pauses it; and if not, it resumes play.

Keyboard maestro 1

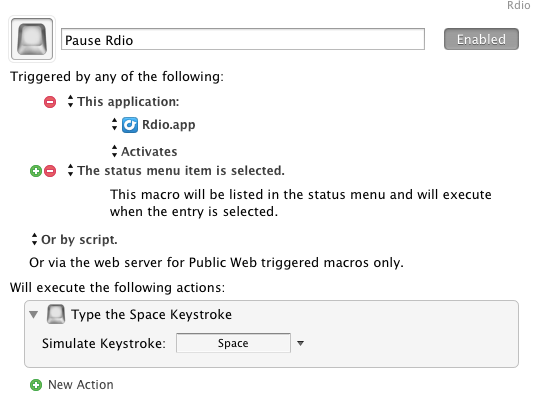
The macro is triggered by the Application trigger, which executes a keystroke simulation—in this case, the Spacebar key.

Automatic Hide

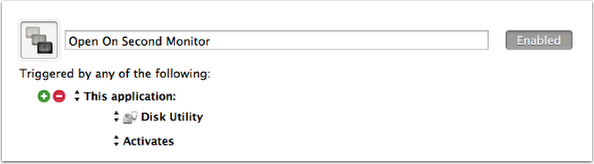
To save yet another click or keyboard shortcut, I use a macro that automatically hides a designated application when it is no longer in the forefront. So in this case, when I click away from Rdio, this macro will hide it after 15 seconds.

This macro is triggered by the Application trigger, which executes a 15 second pause action, followed by a “If Conditions Met Execute Actions,” and an AppleScript action.

Keyboard maestro 3

You cut-and-paste the AppleScript script below, be sure to replace the name of the application in the script with the one you’re building the script for.

tell application “System Events”
set visible of process “Rdio” to false
end tell

Mac Power Users and Keyboard Maestro [News]

Mpu miniDavid Sparks and Katie Floyd, hosts of Mac Power Users, did a podcast about Keyboard Maestro, in which they interviewed Keyboard Maestro guru, Gabe Weatherhead aka MacDrifter.

You can hear the podcast here.

David and Katie always provide some of the best tips and strategies for using Apple and third-party software for better productivity. Their podcasts are for both new and advance Mac users.

Starting I believe in January they will do a series of podcasts on Mac automation. I’m looking forward to it.

By Bakari Chavanu Posted in News